Monday, 27 July 2015

How To Search Any Code Html In Your Blog Template


မဂၤလာပါ ကြ်န္ေတာ္ သည္ေန႕ ေရးျဖစ္လာတဲ႕ နည္းပညာေလးကေတာ့  ဘေလာ့ကာဆိုင္ရာ နည္းလမ္း ေလးဘဲျဖစ္ပါတယ္.. ဒါကေတာ့ ခုေနာက္ပိုင္း Template ဒီဇိုင္းေတြရဲ႕ ေျပာင္းလဲ လာမွဳေၾကာင့္
ကြ်န္ေတာ္ တို႕တေတြဟာ  ကုဒ္ဒင္းေတြ ရွာေဖြ တဲ႕ေနရာမွာ ေတာ္ေတာ္ အခက္ခဲျဖစ္ေစခဲ႕ပါတယ္.. လြန္ခဲ႕တဲ႕ 2010-2012-ေတြတုန္းကလို မဟုတ္ဘဲ တေျဖးေျဖး ေျပာင္းလဲလာတဲ႕ အေျခေနက
သတိမထားမိတဲ႕အခါ မ်က္စိလည္ ေစသလိုျဖစ္ခဲ႕ရပါတယ္.. ခု Template ေတြရဲ႕ ထူးျခားခ်က္ကေတာ့
သူဟာ အတြင္းက ကုဒ္ေတြကို ေခါက္ထားတဲ႕အခ်က္ပါဘဲ..အရင္ကဆို ဘာကုဒ္ဘဲ ရွာရွာ ရွိတာဆို တန္းထြက္လာတယ္..ခုေတာ့ ရွိေနတဲ႕ ကုဒ္ကို ရွာတာေတာင္ မေတြ႕ဘဲ ျဖစ္ျဖစ္ေနတဲ႕ ျပသနာနဲ႕ ၾကံဳ ေနရတဲ႕အခါ မွာ  ဘေလာ့ကာ လူသစ္မ်ားျဖစ္တဲ႕ ညီငယ္ေလးေတြအတြက္ ခဏခဏ လာလာေမးတာကို ေျဖေပးေနရပါတယ္... ဒါကလည္း ကုဒ္ေတြကို အကုန္မျပထားဘဲ ေခါက္ထားတဲ႕ စတစ္ေၾကာင့္လို႕ ေျပာရမွာျဖစ္ပါတယ္...  ဒါကို ကြ်န္ေတာ္တို႕ ဘယ္လိုရွာၾကမလဲဆိုတဲ႕ နည္းလမ္းေလးကို.. ကြ်န္ေတာ္ အလြယ္ကူဆုံး ေျဖရွင္းလုိက္ပါတယ္ေနာ္..ေအာက္မွာ ၾကည့္လိုက္ပါ..

နမူနာအားျဖင့္ Template ထဲမွာ အရွာရေတာ္ေတာ္ ခက္ခဲတဲ႕ ကုဒ္ေလးတခုကို နမူတာအျဖစ္ျပလိုက္ပါတယ္....

     ]]></b:skin>   
 ဆိုတဲ႕ ကုဒ္ေလးကို နမူနာအျဖစ္ ေလ့လာလိုက္ၾကတာေပါ့

  အဆင့္ (၁ )  အေနနဲ႕ မိမိတို႕ဘေလာ့ကာအေကာင့္ကို၀င္ပါျပီးတာနဲ႕ ပုံမွာျပထားသလို Template ကို၀င္ရမွာျဖစ္ပါတယ္..။


 အဆင့္ (၂ ) အေနနဲ႕ကေတာ့ Template Coding ေတြဆီအေရာက္သြားဖို႕ ျဖစ္ပါတယ္...အဲအတြက္
Edit Template ဆိုတာဆက္ကလစ္လိုက္ပါ။ 


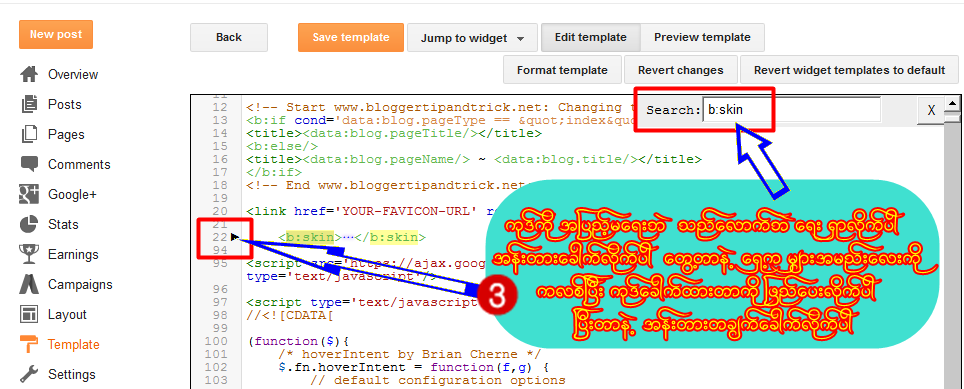
အဆင့္ (၃) အေနနဲ႕ကေတာ့ ကုဒ္ထဲေရာက္တာနဲ႕ ကုဒ္ေတြထဲမွာ ကာဆာတခ်က္(ေမာက္တခ်က္) ကလစ္ျပီး ကီးဘုတ္က   Ctrl+F    ဆိုတာကိုတြဲကလစ္လိုက္ပါ.. ညာအေပၚေထာင့္မွာ Search Box ေလးက်လာပါလိမ့္မယ္....။က်လာတဲ႕ေဘာက္မွာ အေစာက ရွာလိုတဲ႕
]]></b:skin> ဆိုတာကိုတိုက္ရိုက္ရွာမေတြ႕ခဲ႕ပါက   b:skin    ကိုသာေရးျပီး Enter ေခါက္ပါ။
ဒါဆိုေအာက္ကပုံတိုင္းေတြ႕ပါမယ္... ေတြ႕တဲ႕ခါ သူ႕ေရွ႕မွာ ရွိေနတဲ႕ မွ်ားအနက္ေလးကို ကလစ္ျပီး ကုဒ္ေခါက္ထားတာေတြကို ေျဖလိုက္ပါ... ေနာက္ Enter တခ်က္ထပ္ေခါက္ပါ...အိုေက

 
 အဆင့္ (၄)   ကေတာ့ လိုျခင္တဲ႕ ကုဒ္ကိုေတြကေနတာ ျမင္ရပါမယ္...ဒါဆို မိမိတို႕ ရွာေနတဲ႕ကုဒ္ကို ေတြကေနတာမို႕ အဆင္ေျပပါျပီေနာ္....သည္ကုဒ္ေလးဟာ အရွာရခက္ဆုံးလို႕ေျပာလို႕ရမွာပါ.. Widget ေတြေတာ္ေတာ္မ်ားမ်ားကလည္း သည္ကုဒ္ဒင္းေလးကိုအေျခခံျပီး ထည့္ေပးရတာ ေတာ္ေတာ္ ေတြ႕ဖူးပါတယ္  ဒါေၾကာင့္ ဒါေလးကို နမူနာထားလုိက္ရျခင္းျဖစ္ပါတယ္...။


 မွတ္ခ်က္   ။                     ။  နားလည္သိတတ္သလို ကလိနိဳင္ရန္ Jump To Widget ဆိုတာေလးပါ။


အဆင္ေျပပါေစလို႕ ေမွ်ာ္လင့္ရင္း


ဘေလာ့ခရီးသည္သို႕ { ဒီမွာ } သြားလိုက္ပါ
ဘေလာ့ဆုိင္ရာနည္းပညာမ်ား{ ဒီမွာ } သြားလိုက္ပါ
စြယ္စုံစာအုပ္စင္{ ဒီမွာ } သြားလိုက္ပါ

[IMG]
[IMG]

Wednesday, 27 May 2015

Lable ေလးေတြတစ္ခုျခင္းဆီ ကို Recent post အျဖစ္ေဖာ္ျပမယ္


ဒီေန႕ေရးသားျဖစ္တ့ဲအေၾကာင္းရာေလး က ေတာ့ မိမိ တို႕ Blog မွာ ရွိတ့ဲ Lable ေလးေတြတစ္ခုျခင္းဆီ ကို Recent post အျဖစ္ေဖာ္ျပႏိုင္မယ့္နည္းလမ္းေကာင္းေလးပါပဲ..အက်ယ္ရွင္းျပရမယ္ဆိုရင္ေတာ့ Mobile ႏွင့္ ပတ္သက္သမွ် က႑ ကို recent post ျဖစ္ေဖာ္ျပျခင္တယ္ဆိုရင္ ဒီနည္းေလး ကို အသံုးျပုႏိုင္ပါတယ္ Mobile ႏွင့္ ပတ္သက္သမွ်ကိုေဖာ္ျပေနမွာပါ။ ေအာက္ပါအတိုင္းေလးေတြလိုက္ ကလိရေအာင္ေနာ္။


Blogger မွာ login ဝင္ျပီးတာ နဲ႕ စပါမယ္ Template ကိုသြားလိုက္ပါ။
Edit HTML မွာကလစ္လိုက္ပါ ctrl + f ကို အသံုးျပဳျပီး ေအာက္ က ကုဒ္ေလး ကို ရွာေပးပါ

]]></b:skin> 

ေတြ႕ျပီဆိုရင္ သူ႕အေပၚနားေလး မွာ ေအာက္က ကုဒ္ေလးေတြ ကို Copy ကူးထည့္လိုက္ပါ။

/* Recent posts by labels
--------------------------------- */
img.label_thumb{
float:left;
margin-right:10px !important;
height:65px; /* Thumbnail height */
width:65px; /* Thumbnail width */
border: 1px solid #fff;
-webkit-border-radius: 10px;
-moz-border-radius: 10px;
border-radius: 10px;
-webkit-box-shadow: 0 1px 1px rgba(0, 0, 0, .4);
-moz-box-shadow: 0 1px 1px rgba(0, 0, 0, .4);
box-shadow: 0 1px 1px rgba(0, 0, 0, .4);
}

.label_with_thumbs {
float: left;
width: 100%;
min-height: 70px;
margin: 0px 10px 2px 0px;
padding: 0;
}
ul.label_with_thumbs li {
padding:8px 0;
min-height:65px;
margin-bottom:0px;
border-bottom: 1px dotted #999999;
}

.label_with_thumbs li{
list-style: none ;
padding-left:0px !important;
}

.label_with_thumbs a { text-transform: uppercase;}
.label_with_thumbs strong {padding-left:0px; }

ေနာက္ထပ္ရွာရပါဦးမယ္မျပီးေသးပါဘူး  ctrl + f ကို အသံုးျပဳျပီး ေအာက္ က ကုဒ္ေလး ကို ထပ္ရွာေပးပါ

</head>

ေတြ႕ျပီးဆိုရင္ သူ႕ေအာက္နားမွာ ေအာက္ကေပးထားတ့ဲ ကုဒ္ေလးေတြ ကို Copy ကူထည့္လိုက္ပါ။

<script type='text/javascript'>
//<![CDATA[
function labelthumbs(json){document.write('<ul class="label_with_thumbs">');for(var i=0;i<numposts;i++){var entry=json.feed.entry[i];var posttitle=entry.title.$t;var posturl;if(i==json.feed.entry.length)break;for(var k=0;k<entry.link.length;k++){if(entry.link[k].rel=='replies'&&entry.link[k].type=='text/html'){var commenttext=entry.link[k].title;var commenturl=entry.link[k].href;}
if(entry.link[k].rel=='alternate'){posturl=entry.link[k].href;break;}}var thumburl;try{thumburl=entry.media$thumbnail.url;}catch(error)
{s=entry.content.$t;a=s.indexOf("<img");b=s.indexOf("src=\"",a);c=s.indexOf("\"",b+5);d=s.substr(b+5,c-b-5);if((a!=-1)&&(b!=-1)&&(c!=-1)&&(d!="")){thumburl=d;}else thumburl='https://blogger.googleusercontent.com/img/b/R29vZ2xl/AVvXsEh7cqbgHJ_ve-Z0B9p7MXZS7aR11C6Y-vi_03nwL4HRdnpmsVcf6MIQdGn1YwDjGokAXsTqBFbBvMw3qkn99sRg-QV6UtrXbsA9V-39kRapodJhN6xxV194ReHiIov8hKifuxCJr7h1Ei4/s1600/picture_not_available.png';}
var postdate=entry.published.$t;var cdyear=postdate.substring(0,4);var cdmonth=postdate.substring(5,7);var cdday=postdate.substring(8,10);var monthnames=new Array();monthnames[1]="Jan";monthnames[2]="Feb";monthnames[3]="Mar";monthnames[4]="Apr";monthnames[5]="May";monthnames[6]="June";monthnames[7]="July";monthnames[8]="Aug";monthnames[9]="Sept";monthnames[10]="Oct";monthnames[11]="Nov";monthnames[12]="Dec";document.write('<li class="clearfix">');if(showpostthumbnails==true)
document.write('<a href="'+posturl+'" target ="_top"><img class="label_thumb" src="'+thumburl+'"/></a>');document.write('<strong><a href="'+posturl+'" target ="_top">'+posttitle+'</a></strong><br>');if("content"in entry){var postcontent=entry.content.$t;}
else
if("summary"in entry){var postcontent=entry.summary.$t;}
else var postcontent="";var re=/<\S[^>]*>/g;postcontent=postcontent.replace(re,"");if(showpostsummary==true){if(postcontent.length<numchars){document.write('');document.write(postcontent);document.write('');}
else{document.write('');postcontent=postcontent.substring(0,numchars);var quoteEnd=postcontent.lastIndexOf(" ");postcontent=postcontent.substring(0,quoteEnd);document.write(postcontent+'...');document.write('');}}
var towrite='';var flag=0;document.write('<br>');if(showpostdate==true){towrite=towrite+monthnames[parseInt(cdmonth,10)]+'-'+cdday+' - '+cdyear;flag=1;}
if(showcommentnum==true)
{if(flag==1){towrite=towrite+' | ';}
if(commenttext=='1 Comments')commenttext='1 Comment';if(commenttext=='0 Comments')commenttext='No Comments';commenttext='<a href="'+commenturl+'" target ="_top">'+commenttext+'</a>';towrite=towrite+commenttext;flag=1;;}
if(displaymore==true)
{if(flag==1)towrite=towrite+' | ';towrite=towrite+'<a href="'+posturl+'" class="url" target ="_top">More »</a>';flag=1;;}
document.write(towrite);document.write('</li>');if(displayseparator==true)
if(i!=(numposts-1))
document.write('');}document.write('</ul>');}
//]]>
</script>
 

ေနာက္ဆံုးအဆင့္ အေနႏွင့္အသံုးျပဳရမယ့္ကုဒ္ ကို Copy ကူးျပီး။

အသံုးျပဳရန္ကုဒ္ 
 <script type='text/javascript'>var numposts = 3;var showpostthumbnails = true;var displaymore = false;var displayseparator = true;var showcommentnum = false;var showpostdate = false;var showpostsummary = true;var numchars = 100;</script>
<script type="text/javascript" src="/feeds/posts/default/-/Label Name?published&alt=json-in-script&callback=labelthumbs"></script>

   ►1.  Layout ကိုကလစ္ရပါ့မယ္ မိမိတို႕  Dashboard ကေနေပါ့
   ►2.  Add a Gadget ကိုကလစ္ေပးလုိက္ပါ
   ►3.  HTML/Javascript. ကိုကလစ္ျပီး က်လာတဲ့ ေဘာက္ေလးထဲမွာဘဲ
   ►4.  ေအာက္ကေပးထားတဲ့ ကုဒ္ေတြကို ေကာ္ပီယူ ထည့္လိုက္ပါ 

Label Name ဆိုတ့ဲေနရာ မွာ မိမိ တို႕ ဘေလာ့မွာရွိတ့ဲ Label တစ္ခုခု က နာမည္ကိုအစားထိုးေပးလိုက္ရင္ရပါျပီ။


ဘေလာ့ခရီးသည္သို႕ { ဒီမွာ } သြားလိုက္ပါ
ဘေလာ့ဆုိင္ရာနည္းပညာမ်ား{ ဒီမွာ } သြားလိုက္ပါ
စြယ္စုံစာအုပ္စင္{ ဒီမွာ } သြားလိုက္ပါ

Monday, 25 May 2015

Blogger Link Colour နဲ႕ Font Size ေတြကို အလြယ္တကူျပင္ၾကမယ္


links


သည္နည္းေလးကေတာ့..ကြ်န္ေတာ္တို႕ ဘေလာ့ေတြမွာ တခါတခါ စိတ္တိုင္းမက်ျဖစ္တတ္တာေတြ ရွိပါတယ္..
အဲတာကေတာ့ လင့္ကာလာနဲ႕႕  အရြယ္အစားေတြကိုပါဘဲ.. ေသးရတာနဲ႕ ၾကီးးရတာနဲ႕ေပါ့..
ေနာက္...အေရာင္ကိုသေဘာမက်တာနဲ႕ ျဖစ္တတ္လို႕ပါ သည္နည္းေလးကို တင္ေပးလိုက္တာပါ
►1-  Blogger Singin ၀င္လိုက္ပါ။
►2-  Dashboard  ကိုသြားလိုက္ပါ။
►3-  Template    ကိုကလစ္ပါ..။
►4-  Edit  Html   ကို၀င္ပါ.. Process ကိုကလစ္ျပီးဆက္၀င္လုိက္ပါ။
►5-  Ctrl+F  (သို႕မဟုတ္) F3  အကူညီျဖင့္ ေပးထားတဲ့ ကုဒ္ကို ရွာလိုက္ပါ။

]]></b:skin>    သည္ကုဒ္ကို ရွာလိုက္ပါ ေတြ႕တာနဲ႕ သူ႕အေပၚကေန ေအာက္ကကုဒ္ကို ထည့္ေပးလိုက္ေပါ့
ကုဒ္ရွာရတာ အဆင္မေျပဘူးဆိုပါက b:skin ဆိုတာေလးဘဲ ရွာလိုက္ပါ သူ႕ေဘးက ကုဒ္ေတြ ေခါက္ထားတဲ႕ မွ်ားအနက္ေလးရွိမယ္ အဲတာေလးကလစ္ေပးလုိက္ပါ..ေနာက္ search box ကေန အန္တားေခါက္ေပးပါ  ေတြ႕ပါမယ္ လိုျခင္ေသာကုဒ္
.post a{font-weight:bold;font-size:12px;color:#000000;text-decoration:none}
.post a:hover{text-decoration:underline}
အဲကုဒ္ေတြထဲမွာ SIZE 12px ဆိုတာကို ခ်ိန္းေပးရမယ္... လိုသေလာက္ေပါ့  colour #00000 ေနရာ
ကိုေတာ့ မိမိႏွစ္သက္တဲ့ ကာလာကုဒ္ကို အစားထိုးေပါ့... ဒါဆို ာအဆင္ေျပပါျပီ...

ခုလိုအားေပးတဲ့အတြက္ အထူးေက်းဇဴးတင္ပါေၾကာင္း ေျပာၾကားပါရေစ..ဘေလာ့ခရီးသည္မွ နည္းပညာမ်ားအား မည္သူမဆို လြတ္လပ္စြာ ကူးယူသုံးစြဲနိဳင္ပါတယ္.. ကြ်န္ေတာ္ ပိုင္ဆိုင္ေသာေနရာေလးမ်ားအား ဆက္လက္ လည္ပါတ္လိုပါက ***************************************

ဘေလာ့ခရီးသည္သို႕ { ဒီမွာ } သြားလိုက္ပါ
ဘေလာ့ဆုိင္ရာနည္းပညာမ်ား{ ဒီမွာ } သြားလိုက္ပါ
စြယ္စုံစာအုပ္စင္{ ဒီမွာ } သြားလိုက္ပါ